Extras: Kampagnen
If the corresponding module is enabled in your account, you can find it in the menu 'Extras' -> 'Kampagnen' the campaign manager.
Per campaign you send event-driven automated mailing series. This allows you to personalize the sending times and content for each subscriber to a high degree.
You put the sequence together from modules. With the help of all available target group types, you determine when which subscriber should branch out to where.
A simple campaign where every subscriber automatically receives a congratulatory mailing on their birthday might look like this:
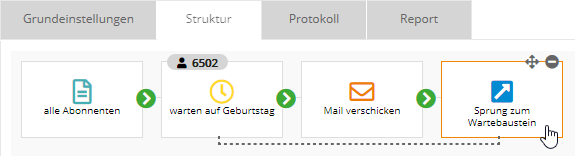
In this example, 6502 subscribers are currently waiting for today's date to match the birthday field of their subscriber data. If this is the case, the respective subscriber moves to the dispatch module and the congratulatory email is sent. He then jumps back to the waiting module to wait 1 year for his next birthday.
Once activated, such a campaign runs permanently in the background and automatically performs the set actions. It constantly reacts to new subscribers and changed subscriber data, such as current target group membership, changed interests or clicks in mailings.
Campaign module 'Basic' or 'Advanced'?
Depending on the Ideenfabrik Mailingwork contract, the campaign module is available in the 'Basic' or 'Advanced' variant. They differ in the available module types:
- Basic: This module is suitable for simple, linear campaigns. Waiting module, dispatch module and jump module are available for this purpose. Typical applications are annual birthday greetings or a weekly series of seminar emails as soon as a new subscriber signs up for the seminar newsletter.
- Advanced: With this module you can create almost any complex campaign. Additionally available are distribution module, condition module, limiter, jump module 'Advanced' and profile enrichment module. Furthermore, the jump module can jump not only within the current campaign, but also to any module of any other campaign. Whether target group-specific offers, individualized welcome series or reminders of an event taking place - the application possibilities are almost unlimited.
Create new campaign
First, design the content concept for your new campaign. This could be, for example, the plan to wish your subscribers a happy birthday by annual postcard.
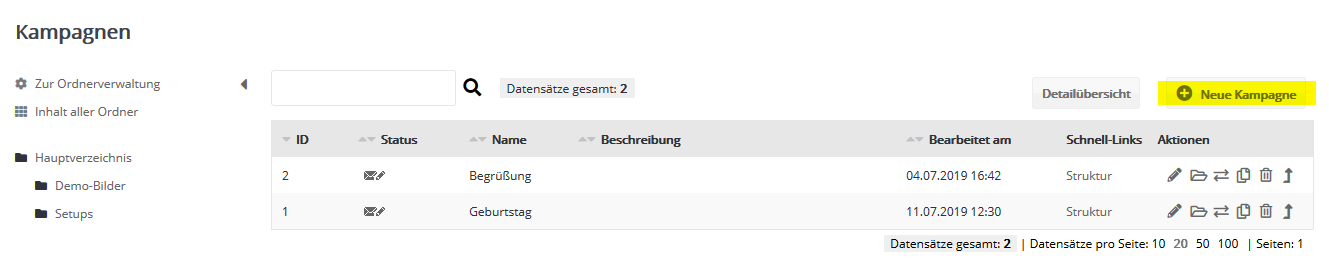
To get started, you can view the sample campaigns for greeting and birthday that are available in ###system_name##.
Campaigns can be opened, edited and deleted or copied/moved to another folder using the icons on the right. By clicking on the 'Open folder' icon you can switch to the current folder containing the campaign.
Parallel to designing the campaign, it is necessary to create all Mailings and Zielgruppen involved in it.
A mailing can only be selected for sending via campaign if two conditions are met:
- In the mailing, under 'Advanced settings' --> 'Type', the type 'Campaign email' (or -SMS or -Postcard) must be set.
- The mailing must be activated at least before the first sending, recognizable in the 'Status' column by the letter symbol
 (without editing pen). If it is not yet activated, open the desired mailing and click on the 'Activate' button on the 'Dispatch' tab. (without editing pen). If it is not yet activated, open the desired mailing and click on the 'Activate' button on the 'Dispatch' tab.
'Basic settings' tab
After clicking on 'New campaign', enter the name and description (optional) of the campaign in the 'Basic settings' tab.
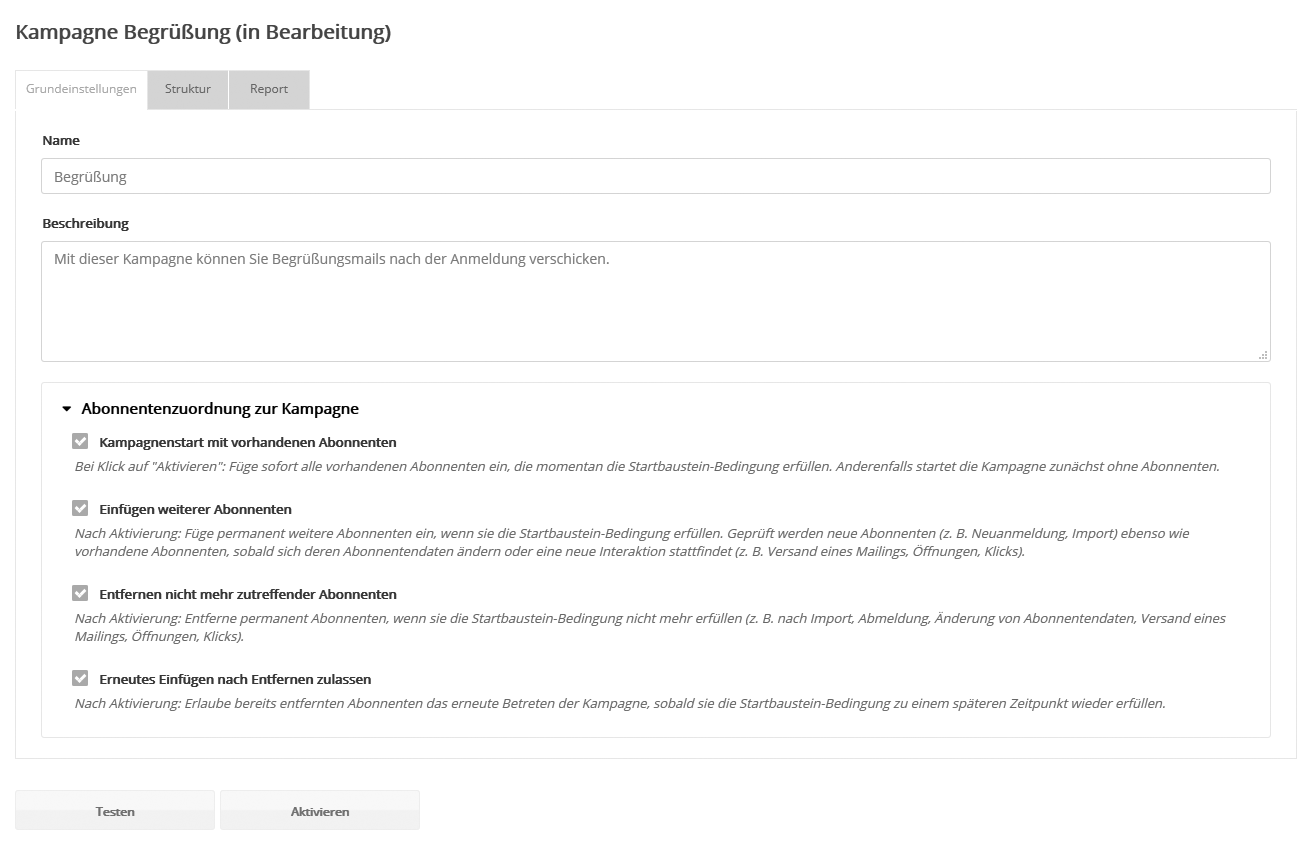
Then you define how the campaign should basically handle subscribers:
- Campaign start with existing subscribers.
This adds all existing subscribers to the campaign that meet the start module condition when you click the 'Activate' button. Typical example is a campaign for existing customers. If the option is not selected, no existing subscribers will enter the campaign, i.e. it will initially start "empty". Once the campaign is activated, the option cannot be changed.
- Insert additional subscribers
This permanently inserts additional subscribers after the campaign has been activated, if they fulfill the start module condition. This does not only apply to new subscribers, e.g. after import or newsletter registration. Each new interaction of an already existing subscriber also leads to a new check whether this subscriber is now allowed to enter the campaign according to the start module condition (if not done so far). The recheck is triggered after each change of subscriber data (e.g. after import/update or profile change), furthermore after each new mailing to this subscriber and as soon as he opens or clicks on a received mailing. Even when the campaign is paused, subscribers continue to be inserted into the start module (and parked there).
On the other hand, if the 'Insert additional subscribers' option is not enabled, no additional subscriber will enter the running (or paused) campaign once it has been activated.
Note: In order to limit the subsequent entry of a campaign to entirely new subscribers, please add an additional "Condition based on subscriber data" to the target group of the start module. For this purpose, you can use, for example, a registration date that you have stored, or the subscriber's 'creation date' that already exists in the system.
- Remove subscribers that no longer apply.
With this, after activating the campaign, all subscribers leave the current (or paused) campaign as soon as they no longer fulfill the start module condition. This can be triggered, for example, by importing, unsubscribing from a newsletter, or changing the subscriber profile. New activities such as clicks and opens also count as a change. If the option is not selected, no subscriber will leave the running (or paused) campaign.
- Allow re-insertion after removal
This allows subscribers who have already been removed from the campaign to re-enter the current (or paused) campaign after the campaign has been activated, as soon as they meet the start module condition again at a later point in time. This could happen, for example, by changing the subscriber profile again or by clicking on a specific link in the newsletter.
'Structure' tab
This is where you assemble the building blocks of your campaign and define its flow.
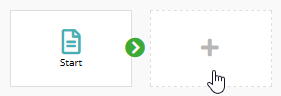
Each newly created campaign is initially in edit mode. You can add a new module by clicking on the plus symbol:
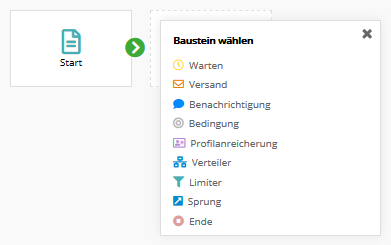
Then select the desired module (the screenshot shows all modules of the Advanced campaign module):
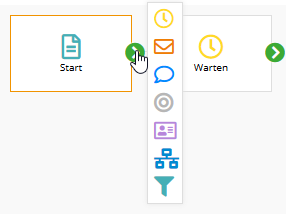
To insert a new block between existing blocks, click on the green arrow of the predecessor block:
|
|
|
Note: Jump modules and end modules can only be inserted at the end of a campaign string, not between two modules.
|
To change the name and properties of a block, click directly on the block. In the pop-up window that appears, give the block a name, an additional description (optional) and set any other block properties.
The name of each block should be ...
- ... be meaningful, so that even a third party understands the basic process. And you yourself, if you want to change the campaign months later.
- ... be unambiguous. This is the only way to uniquely filter the events in the campaign log later on, when you are looking for a specific sequence of events.
The following modules are available in the 'Campaign Basic' module:
 |
|
The start module is at the beginning of each campaign. It decides which subscribers enter the campaign (condition applies) and later possibly leave it again (condition no longer applies).
The condition for this is the subscriber list and target group set in the start module (both are optional). As soon as the campaign is activated, the system regularly checks at intervals of a few minutes which subscribers currently fulfill the start module condition (in with it!) or no longer fulfill it (out with it!). You determine whether these subscribers actually enter or leave the campaign via the options in the 'Basic settings' tab.
|
 |
|
The dispatch module sends a mailing to the subscriber, optionally as email, SMS or postcard.
Mailings can only be selected here if you have the 'Campaign mail' type, see Advanced mailing settings.
To change the content of a mailing while the campaign is running, it must first be 'deactivated'. As soon as you 'reactivate' it after editing, all mails accumulated during the mailing pause will be resent. The same applies to changing the email template of a campaign mail. For the change to take effect, the campaign mail must be briefly deactivated and then reactivated.
|
 |
|
In the waiting module you set how long (period) or until when (time) the subscriber should wait before entering the next module.
Four different waiting modes are available:
- Fixed period: A waiting period can be set here, from minutes to years. A typical application is a seminar series in which several mailings are sent out at fixed intervals.
- Fixed time: Any combination of date, weekday and time can be selected as the time. For example, so that the subscriber leaves the waiting module every Tuesday at 10 a.m., set Weekday to Tuesday, Time to 10 a.m., and leave Day, Month and Year in the default setting 'any'. The conditions are AND-linked, i.e. the wait module is only exited if all conditions apply together.
To be on the safe side, the 'fixed time' is still considered to be fulfilled up to 15 minutes later. All subscribers arriving later remain in the waiting module until the 'missed' condition possibly applies again in the future.
- Next suitable date from profile: The typical "wait until birthday". Here, the value in the date field of each subscriber individually determines how long to wait. The condition is considered to be fulfilled for the entire day, starting from the time set in the module. Optionally, a shift can be added to or subtracted from the subscriber's date. This means, for example, that you can send out arrival information 5 days before the arrival date selected by the subscriber.
- No waiting: The wait module is processed immediately as if it did not exist. This can be useful, for example, to send information to subscribers who have been waiting too long after an unplanned delay.
|
 |
|
The jump module is at the end of the campaign, when the subscriber is supposed to jump back to another module.
This allows the campaign run to be repeated endlessly, for example for an annual birthday mailing. In that case, the subscriber jumps back to the beginning of the campaign after the congratulatory email is sent. The campaign waits again each year for the appropriate date of the birthday.
It would be wrong to link the jump module directly to a dispatch module without an intermediate waiting module. In this case, the mailings would be sent immediately in an endless loop.
|
 |
|
The end module is at the end of the campaign if no return to another module is desired. This is how the subscriber ends his campaign run. As a rule, the subscriber remains in the end module indefinitely. This prevents them from immediately re-entering the campaign and running through it again.
However, if the subscriber later loses his target group affiliation according to the start module condition, he leaves the campaign immediately (every module, including the end module). Unless you have forbidden this in the 'Basic settings'.
|
Additional modules are available in the 'Campaign Advanced' module:
 |
|
The notification module sends a mailing to the email address entered in the module. Unlike the dispatch module, the mail is not received by the subscriber himself, but by your sales representative, for example. This makes it possible to send a notification immediately when an important recipient reaches a key point in the campaign.
You define the trigger for the notification via an upstream condition module, for example. Possible use cases:
- Subscriber reaches a certain interest level
- Subscriber opens a specific mailing or clicks a specific link
- New subscriber selects a certain option in the registration form
- Subscriber imported from your online store has a certain property
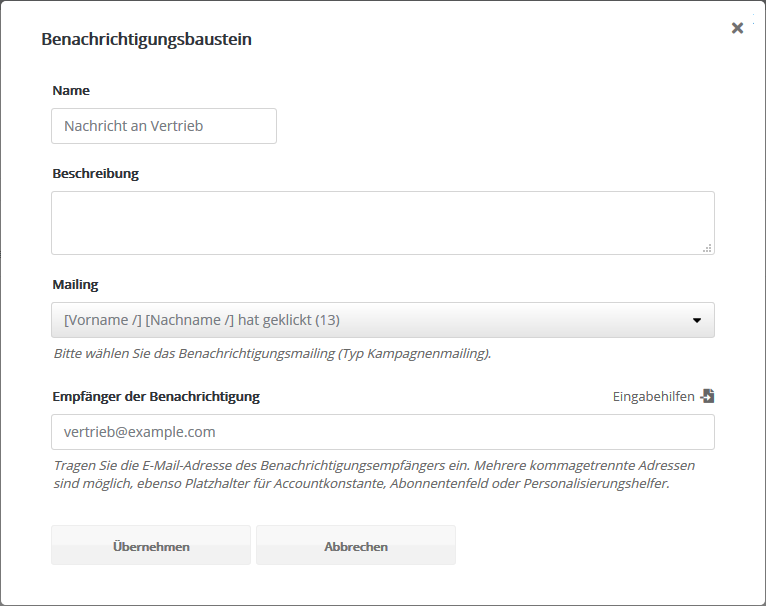
Select the campaign mailing to be sent as a notification. Design the subject and content of the mailing so that your employee immediately sees all relevant subscriber data. For personalization you can use placeholders for Abonnentenfelder, Personalisierungshelfer, Dynamische Inhalte and Accountkonstanten. You include the time of the event as follows: [DATETIME format='%d.%m.%Y %H:%M:%S' /].
Enter one or more comma-separated recipient addresses. You can also personalize the recipient address using the placeholders mentioned above. For example, you can insert the placeholder of a personalization helper that contains the appropriate contact person depending on the target group.
|
 |
|
The condition module is an IF-THEN-OTHER switch that directs a subscriber either one way or the other.
IF the subscriber belongs to the target group set in the condition module, THEN he follows the green arrow, otherwise the red arrow.
Optionally, you can set a waiting period for target group membership in the module, for example, to give subscribers 5 days to respond to opens or clicks after sending a campaign mailing. If the subscriber responds within these 5 days, he immediately follows the green arrow. Only if he does not respond for 5 days, he follows the red arrow.
|
 |
|
With the profile enrichment module, all the options of 'Profilanreicherung' are also available to you automatically as part of a campaign.
Example:
- Automatically record the achievement of a specific campaign location in the subscriber data. For example, after the last mailing module in a seminar series, add a profile enrichment module that enters the name of the seminar series in a "Completed Seminars" multiple selection field.
- Build in a counter for multiple campaign runs to redirect the subscriber to another campaign strand when a maximum value is reached. To do this, use a subscriber field of type 'Integer' and increase its value by 1 for each campaign run via profile enrichment module.
|
 |
|
The distributor routes each incoming subscriber simultaneously into two different strands of the campaign. Thus, two instances of the same subscriber pass through the campaign completely independently of each other.
|
 |
|
The limiter restricts the maximum number of passing subscribers in periods defined by you. It acts as a brake, so to speak.
Possible use cases include:
- You give your staff enough time within office hours to personally call back each subscriber as they arrive at a specific point in the campaign.
- You spread out the mailing of a campaign mailing over time so that you can respond to the expected callbacks in a more scheduled manner.
- You limit coupon mailings to a certain number per weekday.
You can define as many rules as you want. Per rule you set:
- time period (weekdays, times)
- maximum number of subscribers allowed to leave the module within the time period, optionally per hour or day
Define a rule for each period in which you want to limit the number of subscribers passing through. No limit applies outside defined time periods. If multiple rules apply to a time period, the strictest rule applies.
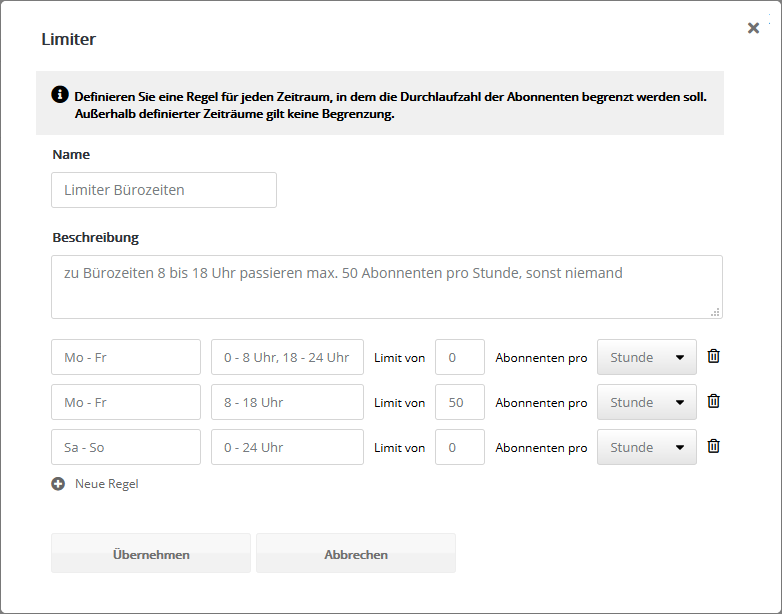
In the above example, the limit is set to 0 on weekdays outside office hours (1st rule) and on weekends (3rd rule). During these periods, none of the incoming subscribers leave the limiter module. On weekdays from 8 a.m. to 6 p.m., a maximum of 50 subscribers per hour leave the module. All additional incoming subscribers wait until the contingent is free again at a later time. The order of the incoming subscribers is maintained.
Note: While the campaign is running, please check from time to time whether the set limits match the number of incoming subscribers.
|
|
|
The jump module 'Advanced' allows not only jumping within the campaign, but also to any module of any other (already activated) campaign.
Note: By jumping to the other campaign, the subscriber leaves the original campaign. However, he still fulfills the start module condition, so he still fits the original campaign. And he actually re-enters it immediately as soon as the campaign manager rechecks his data. This re-check takes place every time the subscriber data is updated, such as after an import or mailing receipt. If you don't want re-entry to be possible after jumping out of the campaign, you can help yourself with a little trick. Insert a distribution module with a branch to an end module before the jump module. This leaves a subscriber copy in the end module, so that the same subscriber cannot re-enter the campaign.
|
Test campaign
Campaigns are a powerful tool. Before using them with real subscriber data, each campaign should be tested extensively.
For this purpose, the Campaign Manager offers a special test mode. To start the test mode, click the 'Test' button at the very bottom.
The additional tab 'Test Recipients' will now appear at the top, more about that in a moment.
In test mode, the start module is overridden, i.e. no subscriber automatically enters or exits the campaign.
Instead, the insertion and removal of each test subscriber is done individually and purely manually. To do this, switch to the 'Test Recipient' tab and click 'New Test Recipient'.
Now use the search function to select a test recipient from any list and target group. As soon as you have inserted the first test recipient, the test run starts. The test recipient runs through the campaign as if it were activated.
In test mode, you can use the 'Ignore wait modules during test' option to speed up the test run. This option only affects waiting blocks, not the waiting period of condition blocks. You would have to change this manually according to the desired test sequence (condition fulfilled or not). However, please do not forget to change the condition modules back to the final settings before activating the campaign.
Activate campaign
After clicking on 'Activate' the campaign is started and now automatically executes the set actions. It runs permanently in the background and reacts constantly to changed subscriber data.
On the 'Structure' tab, you can track how the subscribers go through the campaign. The number above a module shows how many subscribers are currently in the module.
In this example, 6502 subscribers are currently waiting for today's date to match the birthday field of their subscriber data. As soon as this "event" occurs, the respective subscriber moves to the dispatch module and the congratulatory email is sent. Afterwards he jumps back to the waiting module to wait 1 year for his next birthday. The module settings for this example can be found in the section Sample campaign 'Basic': Annual birthday greeting.
'Protocol' tab
The log tab appears as soon as the campaign is activated. Here you can see the detailed progress of each campaign participant. The log entries are kept for the duration of 365 days.
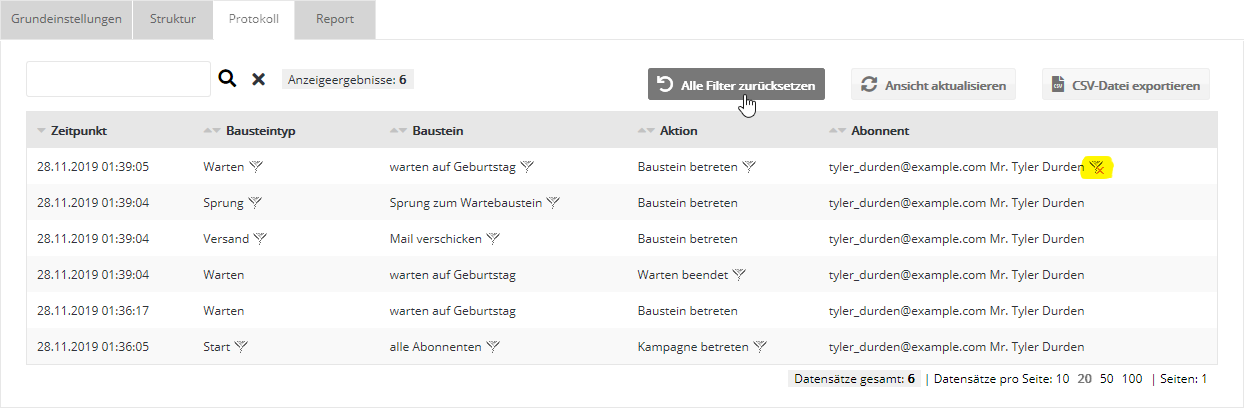
By clicking on the filter icon you can filter the log by module type, concrete module, action or by a specific subscriber. In the example screenshot, a filter is set to a single subscriber. For example, in the case of a customer inquiry, you can quickly see at what time which event was triggered.
After clicking on 'Reset all filters' the unfiltered log is displayed again.
By clicking on 'Export CSV file', the log can be exported as a CSV file, including the current filtering. Examples of use:
- Create a local backup of the current log.
- In case of a more complex search, use the additional filtering options of external software such as Open Office or Microsoft Excel.
Pause, edit and resume campaign
Clicking on 'Pause' pauses the campaign and allows it to be edited again.
In the paused state, subscribers no longer move within the campaign. However, the start module condition will still be checked continuously and applicable subscribers will be inserted into the start module ("parked") or those that no longer apply will be removed from the campaign. If this is not desired, please deactivate the corresponding option 'Insert additional subscribers' or 'Remove subscribers that no longer apply' in the campaign's basic settings.
Before continuing the campaign, you should check whether the number of subscribers accumulated in the start module meets your expectations.
Some notes:
- Delete block: After deleting a module, the question appears whether the entire path behind the module should be deleted or kept. If there are subscribers in the module to be deleted, the question appears whether they should be removed or moved to another module. Any module in the campaign can be selected as the destination.
- Waiting time in the waiting module: A 'fixed time' set in the waiting module is still considered to be valid up to 15 minutes later, just to be on the safe side. However, if the campaign is not continued until after this time window, the time no longer applies. As a result, the affected subscribers remain in the waiting module until the set condition possibly applies again in the future. If 'next suitable date from profile' is set as the time, the condition is considered to be fulfilled for the entire day, even after the additionally set time has already passed.
- Waiting period in the waiting module: Even while the campaign is paused, the waiting period continues. The waiting period of a subscriber always refers to entering the waiting module. For example, if the subscriber entered the waiting module 7 days ago and the campaign was then paused for 5 days, the subscriber will only be in the waiting module for 2 days after the campaign is resumed.
Campaign Reset / Exit
Clicking 'Reset' or 'Exit' will stop the execution of the campaign.
The difference:
- 'Reset' removes all subscribers from the campaign and deletes the campaign log.
- 'Exit' freezes the current state, i.e. the state of all blocks remains unchanged, including the campaign log. No subscriber is moved or newly inserted or removed.
When the campaign ends, the campaign can be edited and reactivated. However, it is not possible to continue the current state, for this purpose please use the 'Pause' button instead of 'Exit'.
Sample campaign 'Basic': Annual birthday greetings
An example of using the 'Campaign Basic' module is a birthday campaign: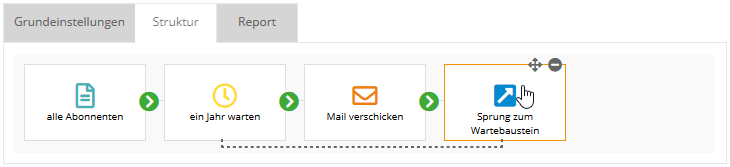
In the start module, you decide which subscribers should enter the birthday campaign. To do this, set the desired subscriber list and/or target group.
The wait module should react individually to the birth date of each subscriber. Therefore, do not set a fixed period or time, but select the waiting mode 'Next suitable date from profile' and for this the subscriber field that contains the date of birth. Set your desired time at which the mailing should be sent by leaving the waiting module. As an additional time period before or after the birth date, select '0 days' in the case of the birthday campaign, so that the subscriber receives the mailing exactly on his birthday.
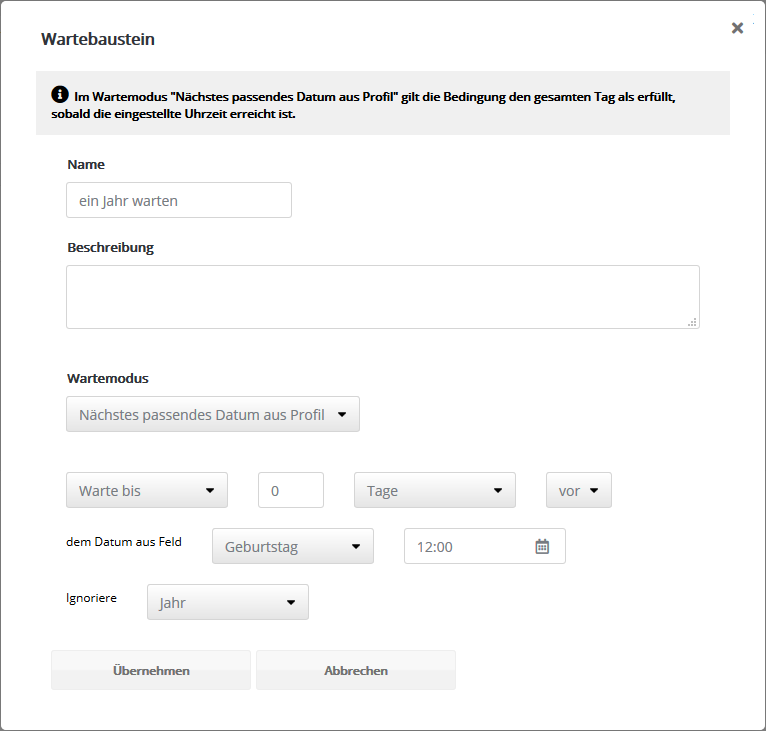
In the 'Ignore' selection field, select the 'Year' option. If you were to evaluate the complete birth date incl. year that lies in the past, the point in time would currently never be reached and all subscribers would be stuck in the waiting module. If you want to change the content of the birthday mailing every year, pause your campaign at the beginning of the year, select the newly created mailing and reactivate the campaign.
In the 'Dispatch module', select your birthday mailing. For a mailing to be selected and sent by campaign, it must have the 'Campaign' type and be 'Activated'.
You connect the 'Jump module' with the wait module. With this, the subscriber jumps back to the beginning of the campaign after the birthday mail has been sent, in order to wait again each year for the appropriate date of his birthday.
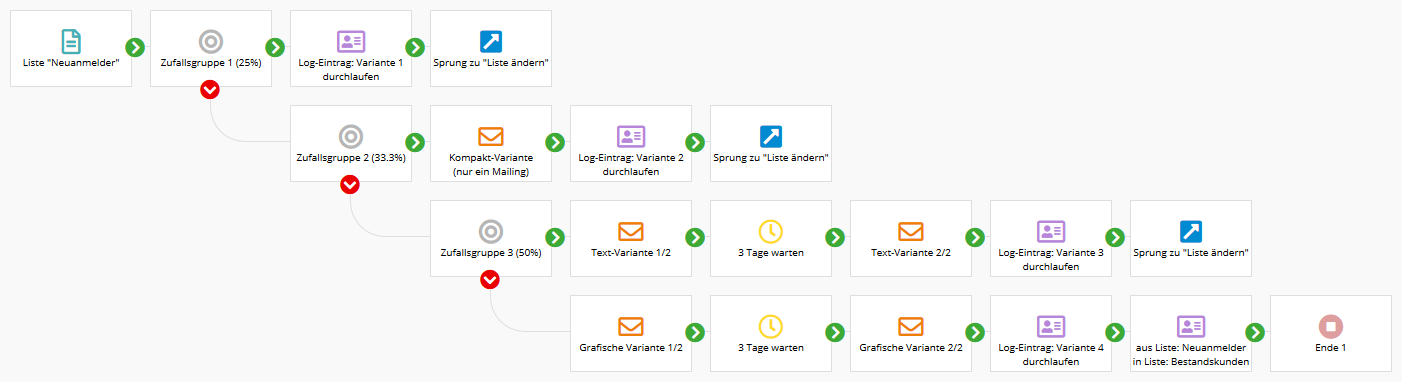
Sample campaign 'Advanced': Welcome Series Shootout!
Per target group type 'Random subscriber selection' you randomly divide your subscribers into groups and guide them through a campaign in different ways. Which sequence is the most successful? Compact or detailed welcome series, with or without images? How many reminders at what intervals are most effective?
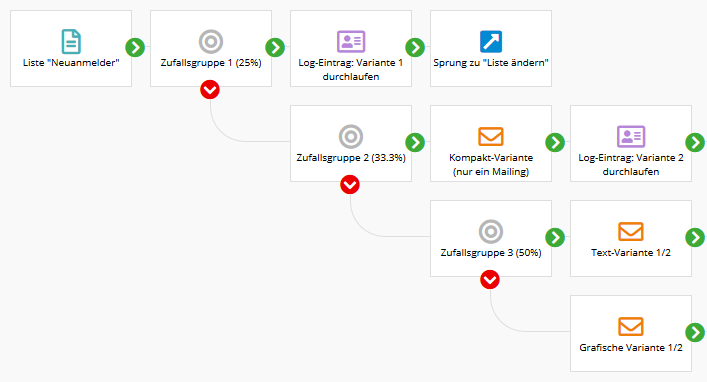
Click on the graphic to see the overall view of the campaign
Starting point: The list 'New subscribers' contains subscribers who have newly subscribed and should then automatically go through a welcome series.
This will randomly divide you into 4 groups that are approximately the same size:
- Group 1 does not receive a welcome mailing. The extreme case as a counter test.
- Group 2 receives the compact welcome variant, i.e. only a single mailing.
- Group 3 receives a text-oriented welcome series consisting of two mailings 3 days apart.
- Group 4 receives a graphic-oriented welcome series, also in two parts with 3 days between them.
In each of the 4 paths sits an enrichment module 'log entry', which enters the number of the path passed through into a subscriber field (e.g. 'welcome group'). This allows subscribers to be filtered by the 4 groups at any time later, even independently of the original random target groups.
After the campaign has been completed, the first follow-up mailings can be used to check in which of the 4 groups the highest open or click rate is achieved.
The process in detail:
- Each new subscriber (list 'New subscribers') enters the campaign.
- The first condition module 'Random group 1' contains a target group with 25% selection probability, i.e. about 25% of the subscribers follow the green arrow to variant 1.
- The remaining approximately 75% do not fulfill the condition and follow the red arrow to the condition module of 'Random group 2'. Since only 75% instead of 100% of the original subscribers arrive here, the condition module for group 2 must filter to 1/3 or 33.3% to achieve approximately the same group size (3/4 * 1/3 = 1/4).
- The condition module for 'random group 3' only reaches about half of the original subscribers. This means reaching another quarter of all subscribers by filtering to 50% probability (1/2 * 1/2 = 1/4).
- All remaining subscribers automatically fall into the 4th group.
- At the end of the campaign, the 4 paths are merged by all subscribers of the upper paths jumping together to the enrichment module 'Change list'.
- The 'Change List' enrichment module changes the list of subscribers from 'New Subscribers' to 'Existing Subscribers'. This means they no longer meet the start module condition and leave the campaign. From now on, they will receive the regular newsletter sent to the 'Existing customers' list.
Notes:
- The group distribution in the campaign example above only works if the 2nd and 3rd random target group is newly created and has not been created as a copy of the first target group. If you are unsure, click 'Redistribute subscribers' once in the 2nd and 3rd target groups. This will ensure that each of the random target groups uses a different distribution key or random selection of subscribers.
- When using the random target group, you should always expect some variation in group size, especially if only a few subscribers are split. The behavior is less similar to exact group splitting in 'A/B-Test', but more like the probability in classic dice rolling. There is no guarantee that exactly five numbers of the upper half and five numbers of the lower half will be rolled in 10 rolls.
- The above campaign flow automatically ensures that the 3 random target groups exclude each other due to the 3 consecutive conditional blocks. The target groups alone do not do this! If you would like to use the identical target group distribution also outside of the campaign, then the respective preceding target groups must be excluded by additional condition "AND not contained in target group x". This means that subscribers of the 2nd target group must not be included in target group 1. Subscribers of the 3rd target group must not be included in target group 1 and must not be included in target group 2. For the subscribers of the 4th group, an extra target group would have to be created that excludes all subscribers of the other 3 target groups.
Example campaign 'Advanced': Write to shopping cart abandoners
Time and again, online store providers find that customers add items to their shopping cart but do not send the order. In this case, the provider should be interested in enticing these customers to make a purchase through special offers and promotions. A mailing campaign specifically for shopping cart abandoners can be very useful.
The online store must provide the identification as a shopping cart abandoner. This can be realized by an appropriate subscriber field (e.g. a checkbox). All other tasks are performed automatically by the campaign. Please note that for this purpose, the setting 'Remove no longer applicable subscribers' must be selected in the 'Basic settings' of the campaign in order to remove the purchasers from the campaign immediately. Likewise, the 'Insert additional subscribers' setting must be selected to enable the insertion of newly entered subscribers.
Below is an example of such a campaign. The shopping cart abandoners will first receive a voucher in order to persuade them to purchase the already selected items after all. If this is also unsuccessful, they will be informed in another mailing and about other items from the range that might also be of interest.

The process in detail:
- In the start module, all subscribers are collected who have been marked as 'shopping cart abandoners' by the store. Subscribers who are already in the campaign are excluded.
- The second module is a waiting module with a waiting time of, for example, 5 days. This means that the subscribers remain in the module for 5 days waiting. During the waiting time, a permanent check is made to see whether the 'shopping cart dropout' feature has already been removed by an order. If this is the case, the campaign run is finished for the subscriber, since he no longer meets the condition of the start module.
- The other subscribers will receive a mailing reminding them of the 'forgotten' shopping cart items in the next step. An additional incentive to buy can be provided, for example, by a voucher included in the mailing.
- Like the second module, the next one is a waiting module, this time with a waiting period of e.g. 10 days. The subscribers thus remain in the module for 10 days. During the waiting period, the module checks again whether the shopping cart abandonment feature has already been removed by an order. As in the other waiting module, the campaign run is ended for all subscribers who no longer apply immediately.
- All remaining campaign subscribers will now receive an infomail, which should give them a closer look at the rest of the store's assortment.
- Subsequently, the shopping cart dropout feature is removed so that the subscriber does not run directly back into the start module after the campaign has run through. In this way, they will only receive a reminder about their shopping cart again when the store software reactivates the 'shopping cart abandoners' feature.
Example campaign 'Advanced': Promote trade show participation
Trade fairs and seminars are usually planned and organized months in advance. With the following campaign, you can organize the advertising and information mailings for your trade fair in advance and thus save your resources shortly before the start of the trade fair. By handling the campaign, you also have a better overview of the timing of the individual mailings. It also gives you a final overview of which part of your advertising campaign was most successful. Please note that for this purpose, the setting 'Remove no longer applicable subscribers' must be deactivated in the 'Basic settings' of the campaign.
In addition, the setting 'Insert additional subscribers' must be selected to enable the insertion of newly entered subscribers. However, please do not forget to deactivate the campaign again in time for the start of your trade show.
If you use a registration setup to register for participation in a trade fair directly in mailingwork, a corresponding feature can already be specified or the subscriber can be entered in a specific list. If an external program is to be used for this purpose, the identification would have to be done by the registration form used or by regularly updating the subscribers via import.
Below is an example of such a campaign. The campaign is intended for a one-time run. That is, each subscriber can enter the campaign at most once. During the campaign run, subscribers who have not yet registered for the show will first receive a motivational voucher. If no booking is made then, they will be informed in a follow-up mailing about other events that might also be of interest to them.
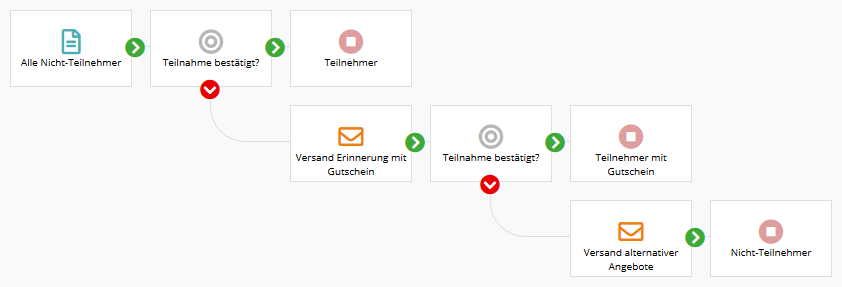
The process in detail:
- In the start module, all subscribers are collected who have not yet entered the order list. Subscribers who are already in the campaign are excluded. This means that no subscriber can run through the campaign more than once at the same time.
- The second module is a condition module with a waiting period of e.g. 5 days. This means that the subscribers stay in the module for 5 days and wait. At the end of the waiting period, the module checks whether the subscriber has already entered the order list by placing an order. If this is the case, the campaign run is finished for the subscriber and he runs into the end module 'Orderer'.
- In the next step, the other subscribers receive a mailing reminding them of 'forgotten' events. A voucher included in the mailing increases the chance of a booking.
- Like the second module, the next one is a conditional module with a waiting period of, for example, 10 days. The subscribers thus remain in the module for 10 days. At the end of the waiting period, the module checks again whether the subscriber is already included in the orderer list through a booking. If this is the case, the campaign run is also finished for the subscriber and he runs into the end module 'Orderer with voucher'.
- All other campaign subscribers now receive an info mail that is intended to introduce them to various other events. They can then be found in the 'Non-orderer' end module.
|