|
Use a template and take care of your contents in the 'Content' tab of your design template. If this is not the case, depending on the choice of format, only HTML tabs, text tabs, or one each in the case of a multipart format will appear.
Contents
On the left side, you can find elements of content which may be created, edited or deleted. Depending on the created template, different elements in different order may be found.
You will find following elements in the basic template:
|
 |
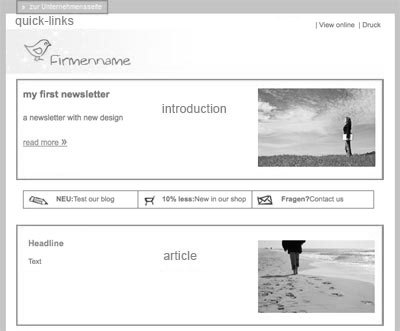
Introduction: This part can be provided with a headline, text or link to an image. Use introduction elements for greetings and for shorter teaser texts, which link, for instance, to the news web page of your company.
Article: This element includes a heading, finished text and, optionally, a picture. The position of the latter may be determined to the left or right side of the text. Visible separators may be included above articles.
Quick Links: With this element, you may create clearly visible links which connect, for example, to a company's web page or another landing page.
In the basic template, mentioned elements will be found on the following positions – to be seen in the preview on the right:
|
 |
|
At the highest top, you will find a quick link followed by an introduction and an article. In your newsletters, you do not have to restrict yourself to one element each. Include as many as you need.
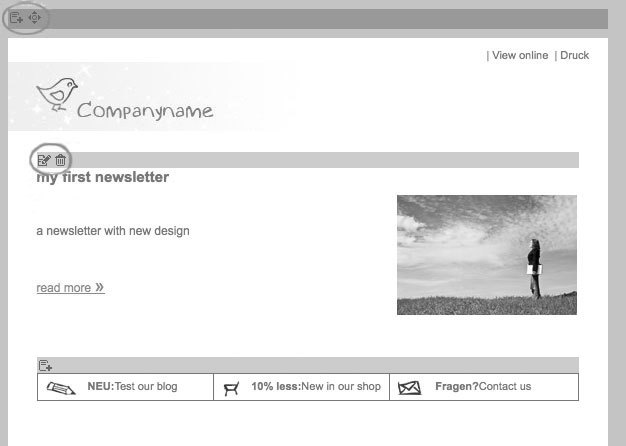
Access to the single elements you will get via the symbols in the tables on the right or by clicking the matching symbols in the preview:
|
 |
|
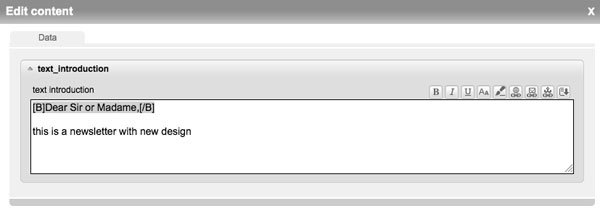
For example that is how you can reach the editing screen for one element. When using more article or introduction elements, you may change the order as you like. At the same time you can quickly introduce or delete elements. If you click on an image a window will immediately pop up in which you can edit the file, name and, if necessary, a link. Finally, you click 'Save'. The HTML and Text parts will automatically be created when using a template.
HTML and/or Text
In the HTML tab, you may create an own design using the, in Ideenfabrik Mailingwork already integrated, HTML editor. Thus, you can influence typography (font, font size, alignment and many more) and the format as well as include images, text, links and tables. These buttons will be available for you in the editor.
|
 |
By clicking the button 'Source' you will switch to the source code view. Here, advanced users may make adjustments and program everything in HTML.
At the end, do not forget to 'Save' your changings. Caching is also recommended.
In the tab 'Text', you create a pure text email or the text part of a multipart email. There are only limited design possibilities. You may include texts and separate characters by using line breaks, distances or hyphens. Images or attachments cannot be directly integrated (indirectly via including links). Links can be included as URLs starting with http://. They are active after dispatch; meaning recipients only have to click on the links and do not have to copy them.
The design of the text part will be less attractive than the HTML part. However, a text part should absolutely be created in a multipart email. Subscribers who only have the display of text activated in their email programs will otherwise not be able to see any contents.
'Save' your changings, please.
|
Integrating and Formatting Texts
Formats:
You can enter texts in the, for this purpose, provided input fields. Text breaks will automatically be adopted. If you want to use different formats, such as 'bold', 'italic' or 'underlined', you only have to select the according text and click on the matching icon.
|
 |
Font sizes:
Click on the Icon 'Change Font Size' (A). In integers, size is individually adjustable. There always has to be a 'px' – standing for pixel – after the number.
Example: [SPAN style='font size:10px'] Font of the size of 10 pixel [/SPAN]
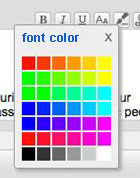
Font Colors
You can choose font colors via the small button with the brush icon. Only mark the according text and choose a color.
|
 |
Links
Links can be included via the link icon. 
If you want to link to Google, for example, the text that is supposed to be linked must be selected, the icon clicked and the target URL in the address field entered. In order to make the links evaluable for the statistics, they should get tracked. For this, you only have to tick in the according link dialog. Furthermore, it is possible to track all links at once. In order to do so, you can tick this option in the tab 'advanced settings'.
|
 |
|
Email links are not tracked; that is why there is a separate button for that: 
Here holds: Select the text and enter the email address in the dialog.
Example: [LINK mailto='test@Ideenfabrik GmbH.de']E-Mail[/LINK]
|
 |
Explanation:
- tracked link: After the mailing's dispatch, you can trace back the recipients' clicking rate in the statistics. This evaluation can be found in the menu item 'Success Evaluation'.
- link with a comment: Instead of the link's name, a comment will be displayed in the statistics. This can be clearer, for example, when there are long link paths.
|
Style Settings
If you have HTML or CSS knowledge you can also make individual adjustments and change the default style settings. When formatting CSS-Styles, there are many possibilities. You can find the according instructions on the free web page:
http://www.css4you.de
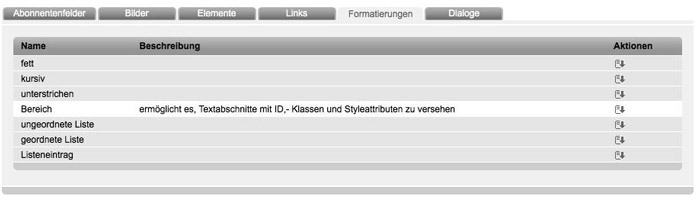
Among the accessibility tools in the tab 'Formats' you can find 'Section'. With the aid of this, CSS instructions are realizable. Included, the placeholder looks like this:
[SPAN id='…' class='…' style='…' TEXT IN CAPITAL LETTERS. [/SPAN]
It is also possible to combine several instructions. For separating, please, use a semicolon (;).
|
 |
Lists
If you want to divide your text into list items, you have to proceed as follows: With the mouse, select the entire text which is supposed to be defined as a list and go to 'Accessibility Tools' in the tab 'Formats'. There you can choose in between the instruction 'Unordered List' or 'Ordered List'.
Example:
- ungeordnete Liste (with bullet points)
[UL]Rattling belongs to handcraft customer understanding and useful interpreting leading successful conversation meaningful goals and successful strategies clear organization in the company [/UL]
- geordnete Liste (with numeration)
[OL]Rattling belongs to handcraft customer understanding and useful interpreting leading successful conversation meaningful goals and successful strategies clear organization in the company[/OL]
Afterwards you have to assign the single list items. In order to do so you have to select the text with the mouse and choose the list item in the menu 'Accessibility Tools' in the tab 'Formats'.
Beispiel:
[UL][LI]Rattling belongs to handcraft[/LI]
[LI]customer understanding and useful interpreting[/LI]
[LI]leading successful conversation[/LI]
[LI]meaningful goals and successful strategies[/LI]
[LI]clear organization in the company[/LI][/UL]
[UL] denotes the beginning of the entire list; [/UL] the end. [LI]is the beginning of a single list item; [/LI] the end.
|